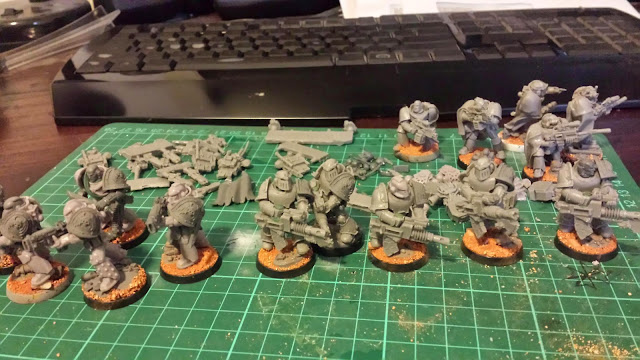
Well, I've been really busy with my studies, but I've still been painting. Here's some updates.
Cacoethes Creo - An Insatiable Desire to Create
A painting and modelling blog born from a desire to create.
Sunday, 21 June 2015
Updates
Thursday, 18 June 2015
Something a little different :)
Stay tuned for more Night Lords - Curze is almost ready!
Saturday, 30 May 2015
Curze progress
After 10 gruelling hours of grinding this non metallic gold - finally finished. Also finished the cloak, but won't be attaching it until the rest is finished.
I gotta tell ya, I'm having a great time painting the primarch.
Monday, 25 May 2015
Curze progress.
I've spent maybe 6-8 hours on the gold trims on his armour. It has at least 6 steps and still another... 4 to go!
I'm really enjoying painting the Primarch of the VIII, the level of detail and sheer coolness value is immensely satisfying.
On a side note, I got a couple of paint racks from back 2 basix. They're amazing.
Saturday, 16 May 2015
Curze
Tuesday, 12 May 2015
Sevatar Finished + updates
Painting Sevatar has been a magnificent experience. One of my favourite sculpts of all time.
I lost a bit of inspiration for a while - starting a new degree (computer animation) has been taking up a lot of time, so I've been a little lacking in motivation. I'm starting to fall back into a rhythm again however, so you will be seeing more work from me very soon.
Wednesday, 29 April 2015
A bit of progress...
I've been away for a week, so I've been unable to do a whole lot. I obtained a destroyer squad and a deimos patter vindicator for the night lords and I've been working on my recon squad.
I also built myself a Moritat, pictured in the last frame. Slinging a pair of volkite serpenta, he is pre-shaded and ready for basecoating.
Monday, 13 April 2015
Seam lines on rhinos :/
Thursday, 9 April 2015
On the importance of preshading - an airbrush lesson.
If you're like me, you probably bought an airbrush because you don't want to waste time doing that most boring of tasks - undercoating and base coating!
An airbrush can be so damn helpful that it will revolutionise your painting workflow so that not only will you get more work done in a smaller period of time, you'll also probably start to enjoy those menial tasks.
If you're like me, you also got straight into airbrushing without a thought for the layering of paint and the slightly odd way in which you need to highlight using an airbrush.
This is called pre-shading.
Here is an example of models that have not been pre-shaded -
Saturday, 14 March 2015
Progress report
So Sevatar is coming along nicely. The display base is shaping up well.
I based my recon, heavy support and special weapons squads and they are now ready for priming and basecoating.
On the recon squad, I decided I really dont like the look of those flimsy sniper bolters with their long barrels, so I started switching them out for the Umbra Ferrox pattern bolters with the sniper scopes. They look a little more hefty, as you'd expect from a space marine legion.
You can also pretty clearly see my conversion work on the autocannons - barrel removed, muzzle brake reattached and chaim bayonets added. I also cut the ammo belts into magazines because they didnt fit onto the backpacks properly.
If you look closely enough, you'll also see some repositioning of legs etc.
I have my terror squad on the way - mkii crusader pattern armor with the terror squad chestplates and helmets. 5 of them will be getting volkite chargers which I plan to convert from my remaining 5 calivers. One will have a flamer and the rest will get some nice bits from the mkiii power weapon kit.
After that, I plan to do a total conversion of my storm raven into a fire raptor gunship and requisition a Javelin pattern land speeder.


